The Art of Craft: Handmade Paper (And How to Make it at Home)
Written by Cole Hancock
Paper is such a commonplace material that we don’t tend to think much about its origin. These days, most paper anyone will come into contact with is thin, perfectly flat, and straight-edged, sent through a multitude of industrial machining to make it so. Before such a process was possible, paper was a more precious material, as each piece had to be hand-crafted. From the conception of paper, this process has involved gathering, picking and peeling, beating and pounding, cultivation of thousands of acres of Kozo, papyrus, cotton, and raw natural materials, followed by the lengthy process of straining pulp through a screen to create a single sheet of paper.

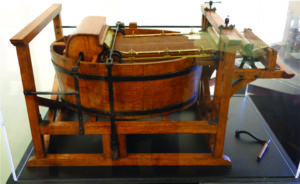
A replica of Nicholas-Louis Robert’s machine, designed to grind pulp, pull sheets, and press/dry/cut those sheets.
The invention of paper was first recorded in 105 AD, and credit was given to Chinese courtier Ts’ai Lun (referred to in Arnold Grummer’s book, Complete Guide to Easy Papermaking). Across the world, paper was made from tree bark, hemp, old rags, fishing nets, papyrus, bamboo, silk, and any other fibrous material that could be beaten to a pulp and would bind together as it dried. For 1,600 years, this was the process, and it required skilled tradespeople to accomplish. Then in 1798, a paper-mill worker named Nicholas-Louis Robert grew annoyed enough at the bickering between the craftspersons in the mill that he invented the paper-making machine and replaced the whole industry. Suddenly, paper was a much more available resource, and printed information could be disseminated to the masses to a prolific degree.
After the change in paper-making methods, handmade paper became a lesser-made luxury item. There’s still something a bit more special about thick fibrous paper with delicately tattered edges and characterized by its grain. This is partially what makes it attractive to contemporary craft-oriented artists like me; another aspect of its allure is its malleability and how it can become more than just a surface on which to mark. Hand-crafted paper can become art in its own right, often used in a sculptural fashion or manipulated to form shapes and images. One prime example of that at present is the artistic work of Denise Bookwalter in collaboration with Lee Emma Running, currently featured in the MoFA show What It Takes.
Making Paper at Home
Because I love to have a physical object to touch, I did most of my learning on this topic from thrifted books, my favorites by Helen Hiebert, Arnold Grummer, Angela Ramsay, and John Plowman. Across them all, however, the basic instructions in making paper remain the same. This is an abridged version.
Materials:
a blender
scrap paper or plant fibers*
a tub or bin, kitty litter bins are cheap and easy to find

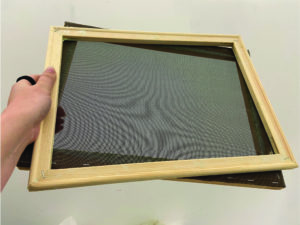
This is a very basic mold and deckle I made from a pair of canvas frames.
a mold and deckle (a frame on the mold used to shape the pulp when making paper by hand)
sponge
couching sheets (ideally wool felt or similarly absorbent fabric)
flat, hard surface
perhaps an iron and thin white cloth, if you’re impatient like me
*Any type of paper can be shredded into pulp for this process; any plant material you use in pulp (with the exception of decorative inclusions) should be boiled with a caustic agent to remove cellulose and then beaten. You can also use small fabric scraps, as long as they don’t get wrapped around your blender blades.
1. Prep your workspace. Set up your flat surface. Put some newspaper under the middle of your couching fabric to add a gentle curve. The cloth should be damp before you roll a sheet of paper onto it.
2. Prep your pulp. You may want to use a thrifted blender for this to keep paper pulp separate from foodstuffs. Half the blender space should be water, and the rest can be shreds of paper (tissue, construction, wrapping, news, etc.) or boiled and beaten plant fibers. Make sure the lid’s on that blender, and give it a spin. The longer you go, the more refined the pulp. A scrappy look can be interesting, but so can smooth uniformity.
3. Your tub should be full of water, deeper than your mold and deckle are tall, and wider than the mold and deckle (mold and deckle making instructions can be found here or bought online). Once you’ve decided you like your pulp consistency, pour it into the tub of water.

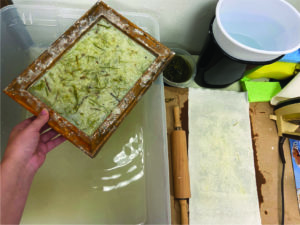
Here I’ve pulled a small sheet with grassy inclusions, about to remove the deckle and press to damp wool fabric
4. Stir the pulp up into the water. Then, scoop your mold and deckle through and bring it up flat, so an even layer of pulp settles onto the screen of the mold as the water drains. To ensure a more even settling, you can shake the mold slightly to distribute the fibers.
5. Remove the deckle from the mold (being careful not to disturb the wet pulp), and then “couch” the sheet onto the fabric on your surface. Accomplish this by turning the sheet facedown to the fabric, and- starting from one full edge- roll the screen across the fabric. Hopefully, the sheet will stick to the damp cloth.
If you can’t get the hang of that method, your best bet is to just lay the screen facedown on a flat piece of fabric and use a sponge to remove as much moisture as possible from the paper before carefully attempting to peel the screen away.

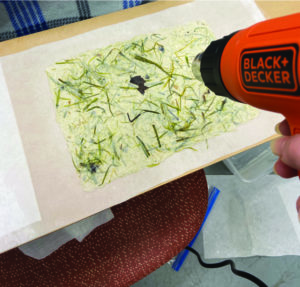
Here I’ve laid the sheet on thinner, drier paper, though instead of a hot iron, I’m making use of a heat gun to dry it faster.
6. Repeat these steps, layering couching fabric atop fresh sheets until you’ve got a small stack. Then, removing the newspaper from under the pile to flatten it and using whatever pressing method is most available to you squeeze as much water as possible from the sheets and the fabric.
7. Once all the water you can get out is out, carefully transfer the sheets to thinner, drier pieces of fabric. This is best accomplished by picking up the thick piece of fabric with a sheet still on it and laying it facedown on the new material. Hopefully, you will then be able to peel the thick fabric away. If that seems improbable, you’ll have to wait for it all to air dry a bit.
8. They should air dry, but if you’re impatient or live somewhere with high humidity (I’m both), you can cover the top of the paper with more thin fabric and use a clothing iron (high heat, but with NO water or steam) to dry it. Don’t let the iron sit on any one part of it too long; move it perpetually. This still takes a while, but it dries the paper much more quickly.
BONUS: You can include pressed flowers, leaves, images, scraps, and general bits of things in the paper by putting them into the pulp on the screen before you’ve fully pulled the mold and deckle out of the water. Gently press the inclusions so that the pulp can creep over the edges and hold them to the paper.

Cole Hancock is a Studio Art (BFA) major and a Museum Studies minor set to graduate from Florida State University in Spring of 2021. She is currently an intern at the Museum of Fine Arts and has previously interned at Gadsden Arts Center and Museum. Cole’s research interests center around using traditional craft techniques in her art to discuss our place in a natural environment. Cole plans to work in a gallery or museum while facilitating her artistic practice.